Weekends With Claude: RPi Homelab
I bought a Raspberry Pi 5 in 2024 and it sat in a drawer for two years. My plan was HDMI-out with some homemade Rust media player — I didn’t know the TV had its own hardware decoders, or that Jellyfin could stream to them over the network. Kubernetes, Argo CD, infrastructure as code, hacked up in a weekend. This post walks through the whole stack, from flashing the SD card to streaming 4K Dolby Vision.
Table of contents
- What is a homelab?
- The Raspberry Pi 5
- Flashing the OS
- mDNS: making rpi.local work
- K3s: Kubernetes on the Pi
- Argo CD: GitOps for the homelab
- SABnzbd: the stateful config problem
- Jellyfin + LG TV: the direct play sweet spot
- The LG C2 and Jellyfin's WebOS app
- Inside the Jellyfin webOS app
- webOS: how an open-source app runs on your TV
- Why this matters: the macOS HDR problem
- What won't play: the direct-play-or-nothing tradeoff
- Performance: what the Pi actually does during playback
- Performance: what the Pi does during active downloads
- Ups and downs (collapsible play-by-play)
- Lessons learned
- The stack
What is a homelab?
A homelab is a small server you run at home. It might be a repurposed desktop, a NAS, or in my case a single-board computer tucked behind a TV. People use homelabs to self-host services they’d otherwise rent from the cloud: media servers, ad blockers, home automation, file storage, game servers.
The appeal is ownership. Your data stays on your network. You choose the software. And you learn a lot about infrastructure along the way. The downside is that you’re the sysadmin, the network engineer, and the on-call team all at once. A good homelab setup minimizes that operational burden.
The Raspberry Pi 5
The Raspberry Pi has come a long way since the original Model B launched in February 2012 with a 700 MHz single-core ARM11 CPU, 512 MB of RAM, and a $35 price tag. The Pi 5 is roughly 600x faster in multicore workloads.
Here’s what’s inside the board:
| Component | Detail |
|---|---|
| SoC | Broadcom BCM2712 — quad-core ARM Cortex-A76 at 2.4 GHz, 16nm process |
| RAM | 8 GB LPDDR4X |
| I/O Controller | RP1 — Raspberry Pi’s in-house “southbridge” chip |
| GPU | VideoCore VII (12-core) with hardware HEVC decoder |
| Storage | 128 GB microSD |
| WiFi | Infineon CYW43455 — dual-band 802.11ac (2.4/5 GHz) |
| Networking | Gigabit Ethernet (via RP1), but I use WiFi |
The BCM2712 is designed by Broadcom, the same company that’s supplied the SoC for every Pi generation. Broadcom designs the ARM CPU cores under license from Arm Holdings and fabricates the chip at TSMC. The Cortex-A76 cores have 512 KB L2 caches each and share a 2 MB L3 cache.
The RP1 is Raspberry Pi’s first custom silicon, seven years and $15 million in the making. It offloads all peripheral I/O from the main SoC: USB 2.0/3.0, Gigabit Ethernet, GPIO, camera/display interfaces. By splitting I/O onto its own chip, the BCM2712 can focus on compute, and Raspberry Pi gains independence from Broadcom’s peripheral IP. The RP1 contains two ARM Cortex-M3 cores, a DMA controller, and 64 KB of SRAM.
Who makes the Pi?
The corporate structure is unusual. The Raspberry Pi Foundation is a UK educational charity, founded in 2008 to promote computer science education. In 2012 it spun out Raspberry Pi Ltd (originally Raspberry Pi Trading Ltd) as its commercial subsidiary to design and sell the hardware. Raspberry Pi Ltd has donated nearly $50 million of its profits back to the Foundation. In 2024, the commercial arm went public on the London Stock Exchange as Raspberry Pi Holdings plc. The Foundation remains a major shareholder.
How much does it cost?
The 8 GB Pi 5 I’m using launched at $80. As of early 2026, memory cost inflation from AI infrastructure demand has pushed prices up — the 8 GB model is around $95, and the 16 GB model has climbed to $205. A 1 GB model was introduced at $45 for folks who just need a lightweight Linux box.
I bought the CanaKit Raspberry Pi 5 Starter Kit - Aluminum in February 2024 for $169.95 (+ $21.95 shipping — $191.90 total). It sat in a drawer for two years before this project. The kit includes the Pi 5 8 GB board, a 128 GB microSD card pre-loaded with Raspberry Pi OS, a USB-C power supply, an aluminum case that doubles as a passive heatsink (with an Arctic thermal pad transferring heat from the CPU to the case — no fan needed), two micro-HDMI cables, and a USB card reader.
Flashing the OS
Before any software, there’s a hardware problem: getting the microSD card into your Mac. The M1 MacBook Pro has a full-size SD card slot, but the Pi uses microSD, and the CanaKit doesn’t include a full-size SD adapter — just a USB-A microSD reader. The ASUS monitor’s USB hub refused to pass it through. What finally worked: the CanaKit’s USB-A card reader plugged into a USB-C to USB-A dongle. Friday night was off to a great start.
I’m running Debian 13 (Trixie) via the official Raspberry Pi OS Lite image. “Lite” means no desktop environment — just a headless Linux system, which is all you need for a server.
The Raspberry Pi OS is built on Debian and maintained by Raspberry Pi Ltd. Trixie is the current testing/stable release of Debian, running kernel 6.12. It ships with systemd, apt, and all the familiar Debian tooling.
To flash the image on macOS, you write it directly to the microSD card with dd:
# identify your SD card (be very careful to pick the right disk!)
diskutil list

# unmount the SD card partitions
diskutil unmountDisk /dev/diskN

# flash the image (bs=4m for reasonable write speed)
sudo dd if=raspios-trixie-arm64-lite.img of=/dev/rdiskN bs=4m status=progress

# eject
diskutil eject /dev/diskN
The rdiskN (with the r prefix) is the raw device, which bypasses macOS’s buffer cache and writes significantly faster.
cloud-init: headless first boot
Rather than plugging in a keyboard and monitor, I configured the Pi for headless access using cloud-init. Cloud-init is the same tool AWS, GCP, and Azure use to bootstrap VMs on first boot. Raspberry Pi OS supports it natively.
You create a user-data file on the boot partition of the SD card:
#cloud-config
hostname: rpi
manage_etc_hosts: true
preserve_hostname: true

users:
  - name: your-username
    groups: sudo
    shell: /bin/bash
    sudo: ALL=(ALL) NOPASSWD:ALL
    ssh_authorized_keys:
      - ssh-ed25519 AAAA... your-key-here

locale: en_US.UTF-8
timezone: America/New_York

packages:
  - avahi-daemon

runcmd:
  - systemctl enable --now avahi-daemon
A few things to note:
preserve_hostname: trueprevents cloud-init from reverting the hostname on reboot (I learned this the hard way when the Pi kept renaming itself toraspberrypi)- I install
avahi-daemonso the Pi announces itself on the local network asrpi.local - SSH keys go here so you can log in immediately without a password
WiFi credentials: the network-config file
Since I’m running the Pi over WiFi (no Ethernet cable), I needed to tell it how to connect to the network before first boot. After flashing the image, remount the SD card and you’ll see a FAT32 boot partition that macOS can read. Create a network-config file alongside the user-data file:
version: 2
renderer: NetworkManager
wifis:
  wlan0:
    dhcp4: true
    optional: true
    access-points:
      "Your-WiFi-SSID":
        password: "your-wifi-password"
    regulatory-domain: US
Cloud-init processes this on first boot using Netplan-style syntax. The Pi’s Infineon CYW43455 WiFi chip supports dual-band 802.11ac, so it’ll connect on 5 GHz if your router supports it. Set regulatory-domain to your country’s ISO 3166 code so the radio uses the correct channels and power levels.
The Pi 5 also has Gigabit Ethernet via the RP1 chip, but WiFi means one less cable — just power and you’re done. The throughput tradeoff is real (WiFi tops out around 100-200 Mbps vs 1 Gbps wired), but 4K streams peak at 80-120 Mbps, so WiFi handles it fine.
Pop the SD card in, plug in power, and within a minute you can ssh your-username@rpi.local.
mDNS: making rpi.local work
mDNS (multicast DNS) lets devices on a local network find each other by name without a DNS server. Apple calls their implementation Bonjour, and the open-source implementation is Avahi. When the Pi runs avahi-daemon, it responds to queries for rpi.local with its IP address.
macOS has Bonjour built in, so rpi.local works out of the box from your Mac. Linux systems with Avahi installed get it too. Most smartphones support it.
One notable exception: LG’s webOS does not implement mDNS. The Jellyfin app on my LG C2 can’t resolve rpi.local, so I have to point it at the Pi’s IP address directly (192.168.1.19). This is why my Traefik routing for Jellyfin doesn’t require a Host header match — the TV connects by IP, and there’s no hostname to match against.
K3s: Kubernetes on the Pi
K3s is a lightweight Kubernetes distribution built for edge and IoT. It strips out cloud-provider integrations and replaces etcd with SQLite, compiling down to a single ~70 MB binary. It’s a perfect fit for a Pi.
Installation is one line:
curl -sfL https://get.k3s.io | sh -
K3s bundles several components out of the box: Traefik as the ingress controller, CoreDNS, a local-path storage provisioner, and metrics-server. On a single-node cluster this gives you a fully functional Kubernetes environment with no additional setup.
k3s config
The config lives at /etc/rancher/k3s/config.yaml:
tls-san:
  - rpi.local
  - 192.168.1.19
kubelet-arg:
  - eviction-hard=nodefs.available<5%,imagefs.available<5%,memory.available<100Mi
tls-san adds Subject Alternative Names to the API server’s TLS certificate, so kubectl can connect via either rpi.local or the IP address without certificate errors. This lets you add the Pi as a kubectl context on your Mac and manage the cluster remotely.
The kubelet-arg line configures disk pressure eviction. On a 128 GB microSD that’s also storing media downloads, the default 15% free threshold is too aggressive — it would taint the node and prevent pods from scheduling when you still have 18 GB free. I dropped it to 5%.
Remote kubectl
After copying the kubeconfig from the Pi, you can manage the cluster from your Mac:
kubectl --context rpi get nodes
kubectl --context rpi get pods -A
No SSH needed for day-to-day operations.
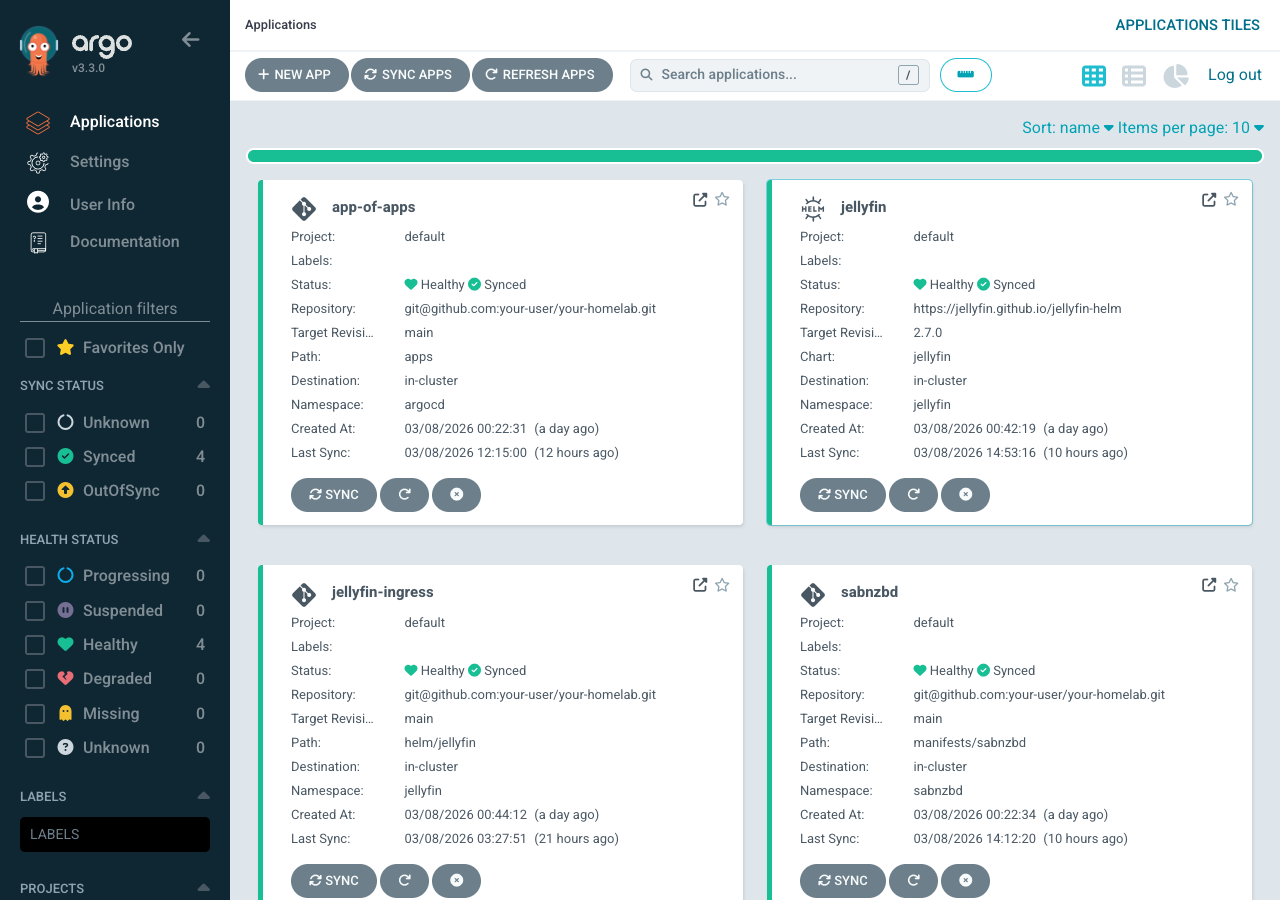
Argo CD: GitOps for the homelab
Argo CD is a Kubernetes-native continuous delivery tool. You declare your desired cluster state in a Git repository, and Argo CD continuously reconciles the cluster to match. Push a commit, and your cluster updates automatically.
For a homelab this is more infrastructure than you strictly need, but relatively future proof. Every configuration change is version-controlled. If you break something, git revert fixes it. You never have to remember what you kubectl apply‘d three weeks ago.
I install Argo CD via its official Helm chart, slimmed down for the Pi:
# argocd/values.yaml - trimmed for single-node RPi

# Disable components I don't need
applicationSet:
  enabled: false
notifications:
  enabled: false
dex:
  enabled: false

# Single replica for everything
controller:
  replicas: 1
server:
  replicas: 1
repoServer:
  replicas: 1

configs:
  params:
    server.insecure: true      # Traefik handles TLS
    server.rootpath: /argocd   # path-based routing
ApplicationSet, notifications, and Dex (SSO) are all disabled — I don’t need them on a single-user homelab. Everything runs as a single replica.
The app-of-apps pattern
Argo CD uses an app-of-apps pattern to manage multiple applications from a single root. The bootstrap Application watches the apps/ directory in the repo:
# apps/bootstrap/app-of-apps.yaml
apiVersion: argoproj.io/v1alpha1
kind: Application
metadata:
  name: app-of-apps
  namespace: argocd
spec:
  project: default
  source:
    repoURL: git@github.com:your-user/your-homelab.git
    targetRevision: main
    path: apps
    directory:
      exclude: bootstrap
  destination:
    server: https://kubernetes.default.svc
    namespace: argocd
  syncPolicy:
    automated:
      prune: true
      selfHeal: true
Any YAML file dropped into apps/ automatically becomes a managed Application. prune: true means if you delete a file, Argo deletes the corresponding resources. selfHeal: true means if someone manually edits something in the cluster, Argo reverts it.
How Argo CD pulls from GitHub
Since this is a private repo, Argo CD needs credentials. I use a GitHub deploy key — an ED25519 SSH keypair where the public key is added to the GitHub repo’s deploy keys (read-only), and the private key is stored as a Kubernetes Secret:
apiVersion: v1
kind: Secret
metadata:
  name: homelab-repo
  namespace: argocd
  labels:
    argocd.argoproj.io/secret-type: repository
stringData:
  type: git
  url: git@github.com:your-user/your-homelab.git
  sshPrivateKey: |
    -----BEGIN OPENSSH PRIVATE KEY-----
    <your-deploy-key-here>
    -----END OPENSSH PRIVATE KEY-----
This is preferable to adding keys to your GitHub user account because deploy keys are scoped to a single repository. If the Pi is compromised, the blast radius is limited to this one repo, and the key is read-only.
Repo structure
The homelab repo (private for now, but here’s the layout):
rpi-homelab/
  argocd/
    install.sh              # bootstrap script
    values.yaml             # Argo CD helm values
    ingressroute.yaml       # Traefik routing for Argo CD UI
    repo-secret.yaml        # deploy key for GitHub access
  apps/
    bootstrap/
      app-of-apps.yaml      # root Application
    sabnzbd.yaml            # SABnzbd Argo Application
    jellyfin.yaml           # Jellyfin Argo Application
    jellyfin-ingress.yaml   # Jellyfin IngressRoute + ConfigMap
  manifests/
    sabnzbd/
      namespace.yaml
      deployment.yaml
      service.yaml
      pvc.yaml
      configmap.yaml         # SABnzbd seed config
      scripts-configmap.yaml # post-processing scripts
      ingressroute.yaml
  helm/
    jellyfin/
      values.yaml            # Jellyfin helm overrides
      configmap.yaml         # network.xml + first-boot setup script
      ingressroute.yaml
  k3s/
    README.md
The bootstrap flow: run argocd/install.sh once. It installs the Argo CD Helm release, applies the IngressRoute, creates the repo secret, and applies the app-of-apps. From that point on, everything is managed by Git.
SABnzbd: the stateful config problem
SABnzbd is a Usenet download client written in Python, using CherryPy as its embedded HTTP server and Jinja2 for templating. CherryPy gives SABnzbd a self-contained web server — no Apache or nginx needed. The web UI (themed “Glitter”) lets users tweak dozens of settings: server credentials, download categories, RSS feeds, bandwidth limits, post-processing options. The config is a single sabnzbd.ini file that SABnzbd reads on startup and writes to continuously as you change settings in the UI.
This is at odds with GitOps, where configuration should be declarative and immutable. If Argo CD overwrites sabnzbd.ini on every sync, any setting you changed in the UI gets blown away.
My solution: seed on first boot, then hands off.
SABnzbd’s config is baked into a ConfigMap. An init container copies it to the PVC — but only if the PVC is empty:
initContainers:
  - name: seed-config
    image: busybox:1.36
    command: ["sh", "-c"]
    args:
      - |
        if [ ! -f /config/sabnzbd.ini ]; then
          cp /seed/sabnzbd.ini /config/sabnzbd.ini
          echo "Seeded sabnzbd.ini"
        else
          echo "sabnzbd.ini already exists, skipping"
        fi
    volumeMounts:
      - name: config
        mountPath: /config
      - name: seed
        mountPath: /seed
The first time the pod starts, it gets the seed config. After that, SABnzbd owns the file. If you need to reset to defaults, delete the PVC and let the init container re-seed.
The ConfigMap in Git serves as documentation of your baseline config and as disaster recovery. Just remember: don’t put your Usenet provider password in a public repo.
Post-processing: wiring SABnzbd to Jellyfin
When SABnzbd finishes downloading a movie or TV episode, I want Jellyfin to pick it up immediately. SABnzbd supports post-processing scripts per category. Mine authenticates against the Jellyfin API and triggers a library refresh:
#!/bin/sh
# notify-jellyfin.sh - SABnzbd post-processing script
JELLYFIN="http://jellyfin.jellyfin.svc.cluster.local:8096/jellyfin"

# Authenticate and get token
TOKEN=$(wget -qO- --post-data='{"Username":"your-user","Pw":"your-password"}' \
  --header="Content-Type: application/json" \
  --header="X-Emby-Authorization: MediaBrowser Client=\"sabnzbd\", Device=\"k8s\", DeviceId=\"sabnzbd1\", Version=\"1.0\"" \
  "$JELLYFIN/Users/AuthenticateByName" | sed -n 's/.*"AccessToken":"\([^"]*\)".*/\1/p')

if [ -n "$TOKEN" ]; then
  wget -qO- --post-data='' \
    --header="X-Emby-Authorization: MediaBrowser Token=\"$TOKEN\"" \
    "$JELLYFIN/Library/Refresh"
  echo "Jellyfin library refresh triggered"
fi
exit 0
Note the Kubernetes service DNS: jellyfin.jellyfin.svc.cluster.local. SABnzbd and Jellyfin are in different namespaces but can reach each other through cluster DNS. No external networking required.
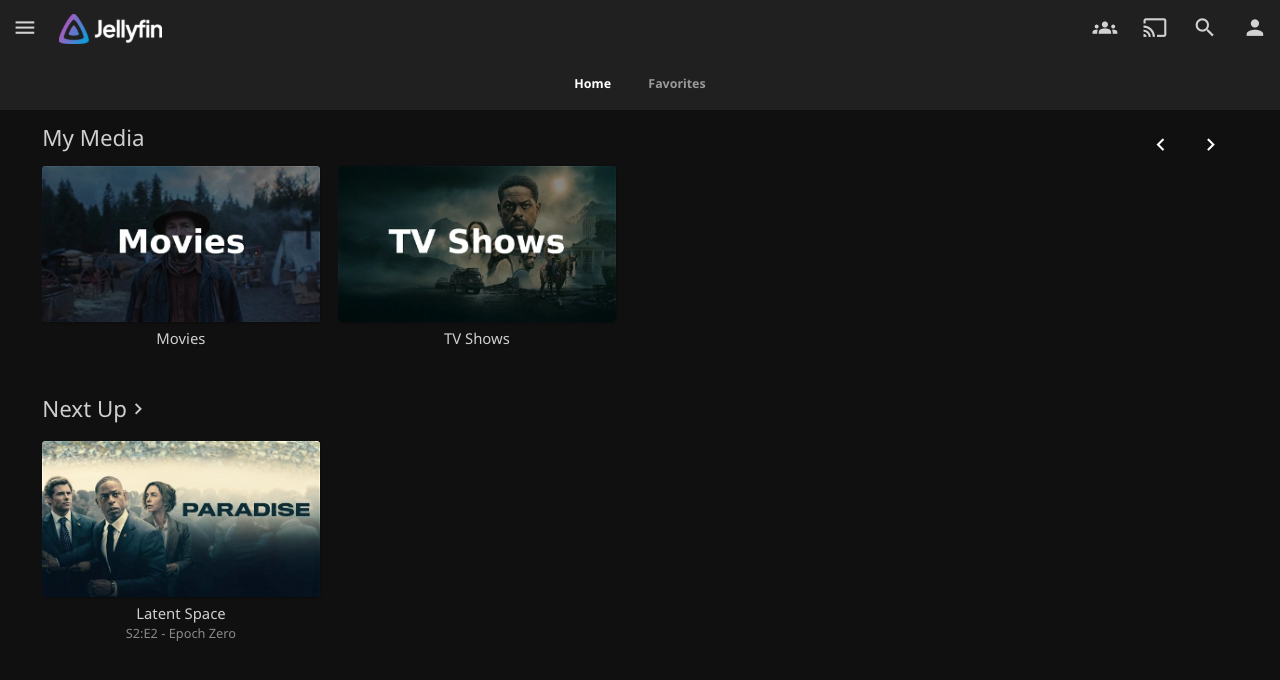
Jellyfin + LG TV: the direct play sweet spot
Jellyfin is an open-source media server, a free alternative to Plex and Emby. The server backend is written in C# running on .NET 9 (formerly .NET Core), which gives it cross-platform support across Linux, Windows, and macOS from a single codebase. Jellyfin descends from Emby 3.5.2 and was ported from .NET Framework to .NET Core as part of the fork. It exposes a REST API that all clients consume, with ffmpeg handling media probing, transcoding, and HLS packaging. It organizes your media library, fetches metadata and artwork, and streams to client apps on TVs, phones, and browsers.
This is a local-network-only setup — the Pi isn’t exposed to the internet. But within the house, Jellyfin supports multiple user accounts, each with their own watch history, progress tracking, and “Continue Watching” state. Someone on the WiFi can watch a movie on the TV via the webOS app, I can pick up a different show on my laptop in the browser, and a guest could stream something on their phone — all simultaneously, all from the same Pi. For direct play, each concurrent stream is just another file read from the microSD card. The Pi’s job is serving bytes over WiFi, and at 10-15 MB/s per 4K stream, three simultaneous streams would still only use ~45 MB/s of the card’s ~90 MB/s sequential read capacity. The bottleneck would be WiFi bandwidth before disk.
The Raspberry Pi 5 cannot hardware-transcode video. Its VideoCore VII GPU has a hardware HEVC decoder but no encoder, and Jellyfin doesn’t support it for transcoding anyway. If Jellyfin needs to transcode a 4K HEVC stream on the Pi, it falls back to software encoding on the CPU, which the Cortex-A76 cores simply cannot do in real time.
This means direct play is essential. The server sends the file as-is to the client, which handles all the decoding. For this to work, the client needs to support every codec in the file natively.
The LG C2 and Jellyfin’s WebOS app
The LG C2 covers the codecs that matter. LG paid the licensing fees to Dolby, so the TV natively decodes:
- HEVC (H.265) up to 4K@120fps
- Dolby Vision Profile 8 (the streaming profile)
- HDR10 and HLG
- Dolby Digital Plus and Dolby Atmos (via eARC or the built-in decoder)
The Jellyfin webOS app is a wrapper around Jellyfin’s web interface, weighing in at 248.7 KB according to LG’s app store listing (the server-side Docker image is 404 MB). It implements a NativeShell bridge that reports the TV’s codec capabilities back to the Jellyfin server. When the server sees that the client supports HEVC, Dolby Vision, and DD+ natively, it skips transcoding entirely and sends the raw file.
Under the hood, the app uses the TV’s HTML5 video element for playback. The webOS platform routes the video bitstream to the TV’s hardware decoder, so the video and HDR metadata are passed through without modification.
Inside the Jellyfin webOS app
The architecture is worth understanding because it’s clever. The webOS app is not a native C++ application or a React Native build. It’s a thin shell written in ES5 JavaScript that loads the full jellyfin-web interface inside an iframe. The shell handles three things the web UI can’t: server discovery (via UDP broadcast), device profile reporting (telling the server what codecs the TV supports), and platform API access through LG’s Luna Service Bus — the IPC mechanism that lets web apps talk to native webOS services.
jellyfin-web itself is a large single-page application descended from Emby’s web client, which Jellyfin forked in December 2018 when Emby went closed-source. The original codebase was vanilla JavaScript with jQuery-era patterns. Since the fork, the Jellyfin team has been incrementally migrating it to React with TypeScript, built with Webpack. It’s a long migration — the codebase still has legacy controllers and web components alongside modern React pages. A separate jellyfin-vue project exists as a ground-up rewrite in Vue.js/Nuxt, but the webOS app still ships the original jellyfin-web.
The ES5 constraint in the webOS shell is deliberate: older webOS versions ship ancient Chromium-based browsers that choke on arrow functions and const. By keeping the shell in ES5 and letting jellyfin-web handle its own transpilation via Webpack/Babel, the app runs on TVs going back a decade.
webOS: how an open-source app runs on your TV
LG has shipped webOS on every smart TV since 2014. The platform has its roots in Palm’s mobile OS, a contemporary of the original iPhone, which HP open-sourced in 2012 before selling it to LG in 2013. LG repurposed it as a TV platform, and in 2018 released an open-source edition of the core OS.
| webOS version | TV model year |
|---|---|
| 1.0 | 2014 |
| 2.0 | 2015 |
| 3.0 | 2016 |
| 4.0 | 2017 |
| 4.5 | 2018 |
| 5.0 | 2019 |
| 6.0 | 2021 |
| 22+ | 2022+ (year-based naming) |
The developer story improved over time. LG’s Developer Mode app lets you sideload .ipk packages onto your TV after registering a free LG developer account. The session lasts 1,000 hours before needing renewal. The webOS Homebrew Project community has pushed this further with persistent sideloading and a homebrew app store via the Homebrew Channel.
Jellyfin first landed in the LG Content Store in July 2022, initially for webOS 6+ (2021 TVs and newer). Older TVs required sideloading through Developer Mode. Since then, LG has approved the app for the Content Store on all webOS versions back to 1.2, meaning it’s now a one-click install on LG TVs as far back as 2014. This is possible because webOS has always been a web-first platform — the same HTML5/CSS/JavaScript runtime that runs Netflix and YouTube runs Jellyfin.
Why this matters: the macOS HDR problem
If you’ve ever tried to play a 4K Dolby Vision file in VLC on a Mac, you’ve probably seen the infamous purple-and-green tint. VLC can tone-map HDR10 to SDR for display, but it cannot interpret Dolby Vision metadata — the proprietary enhancement layer that Dolby licenses to hardware vendors. Without the Dolby license, the player falls back to a broken color mapping that produces psychedelic garbage.
There’s no software fix. Dolby Vision is a closed ecosystem: you need licensed silicon to decode it. Apple’s own apps (Apple TV, Safari) handle it because Apple pays Dolby, but third-party players like VLC and mpv are out of luck.
With the LG + Jellyfin setup, this doesn’t come up. The TV has the Dolby hardware; Jellyfin just serves the file.
What won’t play: the direct-play-or-nothing tradeoff
Since the Pi can’t transcode, any file the TV can’t decode natively simply won’t play. There’s no graceful fallback. Here’s what I expect to hit:
- AV1 — increasingly common on torrents and YouTube rips. The LG C2’s SoC doesn’t have an AV1 hardware decoder (LG added that in the 2023 C3). AV1 files will either fail outright or Jellyfin will attempt a software transcode that runs at roughly 2 fps on the Cortex-A76 cores. The 2024+ models and newer TVs handle AV1 natively.
- x264 (H.264) at high bitrates — the TV decodes H.264 fine, but some scene releases use H.264 at 40+ Mbps for 4K. The TV handles it, but there’s no HDR metadata in H.264, so you lose Dolby Vision and HDR10. The image will look washed out compared to the HEVC version of the same content.
- DTS and DTS-HD audio — LG’s webOS dropped DTS support starting with 2020 models after a licensing dispute with DTS (now Xperi). The C2 cannot decode DTS natively. Jellyfin can transcode just the audio while direct-playing the video, and the Pi has enough CPU for that, but it adds complexity and a slight delay. Files with DTS-only audio tracks are common in older Blu-ray rips.
- TrueHD Atmos — the TV supports Dolby Digital Plus with Atmos (the lossy streaming format), but not TrueHD Atmos (the lossless Blu-ray format). Remuxes from UHD Blu-rays often have TrueHD as the primary audio. Jellyfin will fall back to audio transcoding or a secondary AC3 track if one exists.
- Dolby Vision Profile 7 — UHD Blu-ray remuxes use DV Profile 7 (dual-layer, MEL/FEL). The LG C2 supports Profile 7 for Blu-ray playback via its own apps, but the Jellyfin webOS app can only signal Profile 8 (single-layer, the streaming profile). Profile 7 files may play without the DV enhancement layer, falling back to the HDR10 base.
- Subtitles in PGS/VOBSUB format — bitmap-based subtitle formats can’t be passed through in direct play. Jellyfin has to burn them into the video stream, which triggers a full video transcode. SRT and ASS (text-based) subtitles are fine since the client renders them as an overlay.
The practical impact: most content from Usenet and streaming-era sources is HEVC with DD+ or AAC audio, which plays perfectly. The pain points are Blu-ray remuxes (DTS audio, Profile 7 DV, PGS subtitles) and cutting-edge AV1 encodes. I accept the tradeoff — the files that don’t work are a small minority, and for those I’d use a different player anyway.
Performance: what the Pi actually does during playback
Here’s what the Pi looks like while streaming a 4K HEVC Dolby Vision episode to the LG C2:
| Metric | Value |
|---|---|
| Video | HEVC Main 10, 3840x2160, 13.6 Mbps (direct, no transcode) |
| Audio | Dolby Digital+ 5.1, 256 kbps (direct, no transcode) |
| Total bitrate | 23.5 Mbps |
| Container | MKV remuxed to MPEG-TS (HLS segments) |
| Protocol | HTTP via Traefik reverse proxy |
| WiFi TX | 2.1 MB/s (17.6 Mbps) |
| CPU | 97% idle, 2% user, 1% system, 0% I/O wait |
| Disk read | 0 MB/s (file cached in Linux page cache) |
| Load average | 0.32 |
| RAM available | 5.9 GB of 8.1 GB |
The Pi isn’t breaking a sweat at 97% idle. Jellyfin reports PlayMethod: Transcode which sounds alarming, but both video and audio are passed through untouched — the “transcode” is just a container remux from MKV to MPEG-TS for HLS delivery. No pixels are being re-encoded.
HLS (HTTP Live Streaming) is Apple’s adaptive streaming protocol, now an industry standard. Instead of sending the media file as a single download, the server slices it into small .ts (MPEG transport stream) segments and serves them over plain HTTP with an .m3u8 playlist index. The client fetches segments sequentially, buffering a few ahead. The “adaptive” part: HLS supports a master playlist that points to multiple variant streams at different bitrates and resolutions. The client monitors its own download speed and switches between variants mid-stream — if WiFi degrades, it drops from 4K to 1080p seamlessly, then jumps back when bandwidth recovers. This is how Netflix and YouTube handle variable network conditions (or its close relative DASH). It works through any HTTP infrastructure — CDNs, reverse proxies, caches — without special streaming servers. Jellyfin doesn’t use adaptive bitrate in this setup since there’s only one quality level (the original file, remuxed). The adaptive machinery would require either pre-encoded variants or real-time transcoding at multiple bitrates, neither of which the Pi can do.
Jellyfin uses ffmpeg’s -hls_time flag to control segment duration. For direct play (codec copy), the segments in my setup are 1 second each, roughly 2.9 MB at this bitrate. For software transcodes, Jellyfin uses 3-second segments. The short segment duration keeps seek latency low — when you skip ahead, the TV only needs to wait for the next 1-second chunk, not buffer a larger segment.
What an HLS playlist looks like (click to expand)
The .m3u8 playlist is a plain text file that the TV fetches first. It lists every segment with its duration:
#EXTM3U
#EXT-X-VERSION:3
#EXT-X-TARGETDURATION:2
#EXT-X-MEDIA-SEQUENCE:0
#EXT-X-PLAYLIST-TYPE:VOD
#EXTINF:1.001000,
34abd5c3007c00ec6f1ee2fb3a49983a0.ts
#EXTINF:1.001000,
34abd5c3007c00ec6f1ee2fb3a49983a1.ts
#EXTINF:1.001000,
34abd5c3007c00ec6f1ee2fb3a49983a2.ts
... ~2,700 entries for a 45-minute episode ...
#EXT-X-ENDLIST
Each #EXTINF line gives the segment duration (1.001 seconds), followed by the .ts filename. The filenames are relative URLs resolved against the Jellyfin server base URL. The TV requests each segment sequentially over HTTP as playback advances. The playlist itself is a few hundred KB of text; the media data is in the .ts files.
The delivery path: the TV’s Jellyfin app requests HLS segments over plain HTTP from rpi.local. Traefik (the K3s ingress) reverse-proxies the request to the Jellyfin pod, which reads the MKV file, remuxes each chunk into a .ts segment, and sends it back. The TV’s hardware decoder handles HEVC, Dolby Vision, and DD+ natively.
The disk read of 0 MB/s is real — this episode was recently downloaded, so Linux’s page cache is serving it entirely from RAM. On a cold cache, you’d see ~2-3 MB/s of sequential reads from the microSD, which is still trivial. The CYW43455 WiFi chip is pushing 17.6 Mbps of the file’s 23.5 Mbps bitrate (the difference is protocol overhead and buffering). A single 4K stream barely dents the Pi’s resources.
Performance: what the Pi does during active downloads
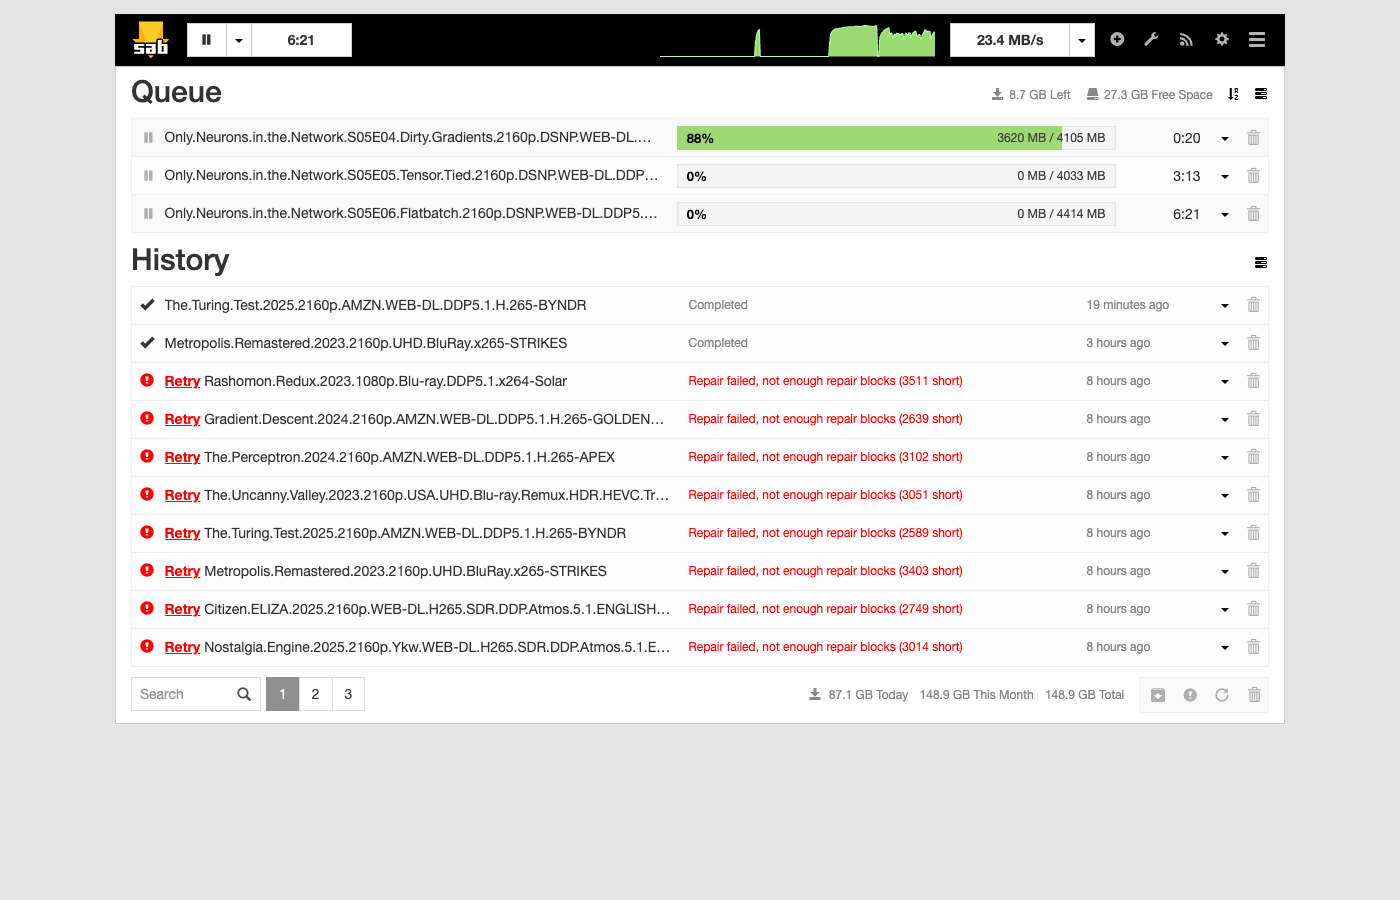
During active Usenet downloads (SABnzbd pulling three 4K episodes simultaneously), the picture changes — the microSD becomes the star of the show:
| Metric | Value |
|---|---|
| CPU idle | 65.8% |
| CPU iowait | 16.1% |
| CPU user + system | 15.1% |
| Load avg (1/5/15m) | 6.77 / 3.53 / 2.04 |
| WiFi RX | 11 MB/s (88 Mbps) |
| Disk write | 25.9 MB/s |
| SABnzbd RAM | 230 MB |
| Jellyfin RAM (idle) | 595 MB |
| Available RAM | 5.7 GB of 8.1 GB |
The CPU is mostly idle, but 16% of its time is spent in I/O wait — threads blocked waiting on the microSD. The load average of 6.77 on 4 cores looks alarming but is inflated by I/O-blocked threads, not actual CPU saturation.
Disk writes (25.9 MB/s) exceed network ingest (11 MB/s) because SABnzbd’s pipeline is serialized: it downloads, then verifies par2 checksums, then decompresses — never overlapping stages. With direct_unpack = 0 and safe_postproc = 1, the microSD only handles one type of I/O at a time. The write amplification comes from SABnzbd’s article cache (cache_limit = 1G) flushing to disk in bursts while the download stream continues filling it. The WiFi chip is pulling 88 Mbps, close to the practical ceiling for 802.11ac in a home environment.
This is the workload that drove all the ionice tuning — without I/O priority, even a single-stage workload like downloading can starve Jellyfin’s read path and cause buffering during playback.
Ups and downs
The entire homelab was built in a single day — a Friday night session and a Saturday afternoon. Nearly every problem followed the same arc: deploy something, discover a resource constraint or compatibility issue unique to the Pi’s hardware, fix it in Git, push, let Argo sync. The microSD card was the root cause of most pain — it’s the one component you’d upgrade first if doing this again.
Full git play-by-play (click to expand)
Friday night: standing it up
12:07 AM — Argo CD boots. First commit. K3s is running, Argo CD is installed, the app-of-apps pattern is wired up. GitOps is live.
12:22 AM — SABnzbd deployed. Raw Kubernetes manifests for SABnzbd land in the repo. Argo syncs them automatically. Downloads start flowing within minutes.
12:26 AM — RSS feeds wired up. DogNZB bookmarks feed added so movies queue automatically.
12:29 AM — First bug. SABnzbd’s INI format is picky about quoting. The RSS feed URIs needed quotes escaped a specific way. Quick fix, push, Argo syncs.
12:42 AM — Jellyfin joins the party. Initial deployment shares SABnzbd’s download directory via a hostPath volume. Both services can see the same files.
12:44 AM — Pivot to Helm. Switched Jellyfin from raw manifests to the official Helm chart. Multi-source Argo Application pulls the chart from Jellyfin’s Helm repo and values from the Git repo.
12:52 AM — RSS feed tuning. Bumped results to 250, immediately dropped back to 100. On a 128 GB SD card, you don’t want to queue 250 movies at once.
1:01 AM — Jellyfin can’t route. Jellyfin’s web UI expects to live at a subpath (/jellyfin), but the default config puts it at root. Created a ConfigMap with network.xml to set the BaseUrl. Needed a few iterations to get the seeding approach right (1:08, 1:11).
1:25 AM — Downloads land in the wrong place. Jellyfin expects movies and TV in separate directories. Updated SABnzbd categories to sort completed downloads into complete/movies/ and complete/tv/.
1:32 AM — Automated setup wizard. Wrote a shell script that waits for Jellyfin to boot, completes the setup wizard via the API, creates a user, adds Movies and TV libraries, and triggers the first scan. All of this runs in the background on first boot.
1:37 AM — LG TV can’t connect. The IngressRoute required Host(rpi.local), but the LG C2 connects by IP address because webOS doesn’t support mDNS. Dropped the Host match so Jellyfin accepts connections from any hostname.
1:51 AM — First movie plays. README written with performance baselines. 4K Dolby Vision streaming to the LG C2, CPU at 93% idle. Time for bed.
Saturday morning: the wheels come off
Woke up to find Jellyfin unreachable. The Pi’s disk was 94% full — downloads had been running all night. Kubernetes had applied a disk-pressure taint to the node, evicting pods.
The default kubelet eviction threshold is 15% free space, which on a 128 GB card means pods get evicted when you still have 18 GB free. With 4K movies at 15-50 GB each, that threshold hits fast. Lowered it to 5% and restarted K3s. Pods rescheduled.
Then: 95% I/O wait. SABnzbd was running two unrar processes simultaneously, each hammering the microSD with random reads and writes. The Pi was essentially frozen — SSH took 30 seconds to respond.
3:17 AM — Permission denied. SABnzbd couldn’t write to complete/tv/ and complete/movies/. The directories didn’t exist yet, and the container’s user didn’t have permission to create them. Added an init container to pre-create the directories with correct ownership.
3:24 AM — Jellyfin doesn’t see new files. Downloads complete but don’t appear in the library. Enabled realtime filesystem monitoring in Jellyfin’s library options.
3:30 AM — Obfuscated filenames. Usenet downloads often have randomized filenames to evade DMCA takedowns. SABnzbd can deobfuscate them post-download, but the option was off. Enabled deobfuscate_final_filenames — but discovered the UI checkbox didn’t reflect the config file setting. Had to toggle it in the UI directly.
Saturday afternoon: taming the I/O beast
12:12 PM — Disable direct unpack. SABnzbd’s “direct unpack” feature starts extracting files while still downloading. On a microSD card this creates a devastating read/write storm — simultaneous reads and writes from different stages competing for the same slow storage. Disabled it (direct_unpack = 0) and enabled safe_postproc so SABnzbd strictly serializes its pipeline: download, then par2 verify, then unrar. One stage at a time. Also dropped unpack threads to 1.
12:24 PM — SABnzbd OOM killed. The Python process plus unrar exceeded the 1 GB memory limit. Kubernetes killed the container. Bumped the limit to 2 GB.
1:22 PM — ionice for the unrar process. Set SABnzbd’s post-processing to ionice -c3 (idle I/O class). This means unrar only gets disk time when nothing else needs it.
1:32 PM — Priority for Jellyfin. Wrapped Jellyfin’s entrypoint with ionice -c2 -n0 (best-effort, highest priority). Now when you’re watching a movie and SABnzbd is unpacking in the background, the stream gets first dibs on the SD card.
1:59 PM — UNPACK folders showing in Jellyfin. SABnzbd creates temporary _UNPACK_ directories during extraction. Jellyfin saw them and added half-extracted movies to the library. Set SABnzbd’s nomedia_marker to create .nomedia files in those directories.
2:08 PM — Wrong marker file. Jellyfin doesn’t honor .nomedia — that’s an Android convention. Jellyfin uses .ignore files. Changed the marker, backfilled .ignore into existing _UNPACK_ directories. The phantom movies disappeared from the library.
2:51 PM — Jellyfin ffmpeg OOM. Started streaming and ffmpeg (which Jellyfin uses even for direct play, to probe file metadata and remux to HLS) got killed by the OOM killer. Jellyfin was at 1.4 GB of its 2 GB limit when ffmpeg launched. Bumped the limit to 3 GB.
Post-commit: A reboot revealed that cloud-init was resetting the hostname to raspberrypi on every boot. Services came up but Traefik had a stale pod from before the reboot stuck in a crash loop. Deleted it, set preserve_hostname: true in cloud-init, and everything stabilized.
Lessons learned
microSD is the weakest link. When SABnzbd is downloading, unpacking, and Jellyfin is streaming simultaneously, the SD card becomes the bottleneck. I set up ionice to give Jellyfin I/O priority (ionice -c2 -n0, best-effort highest) and demote SABnzbd’s post-processing to idle (ionice -c3). This keeps streams smooth even during heavy downloads. One subtlety: ionice only affects disk I/O scheduling through the Linux block layer — it has no effect on network traffic. SABnzbd still pulls articles from Usenet at full WiFi speed; it’s only the writes to the microSD that yield to Jellyfin’s reads. This is the right tradeoff, since the SD card is the bottleneck, not the network. If you needed to throttle network bandwidth too, you’d use SABnzbd’s built-in bandwidth_max setting or Linux traffic control (tc).
128 GB is tight. 4K movies are 15-50 GB each. With the OS, Kubernetes, and application data, you’ve got maybe 60 GB for media. An external USB drive is the obvious next step. The Pi 5’s USB 3.0 ports (via RP1) can sustain over 400 MB/s with an SSD.
Memory limits matter. Both SABnzbd and Jellyfin hit OOM kills before I tuned their memory limits. SABnzbd’s Python process plus unrar can spike past 1 GB; I set its limit to 2 GB. Jellyfin’s ffmpeg probe buffers pushed it past 2 GB during library scans; I set its limit to 3 GB. On an 8 GB Pi with K3s overhead, you need to be deliberate about resource allocation.
GitOps works for homelabs. Having every config change in Git made debugging dramatically easier. When something broke after a reboot, I could diff against the last known-good state. When I needed to tune SABnzbd’s I/O settings, I edited a YAML file, pushed, and Argo CD handled the rest.
The stack
For anyone building something similar, here’s the complete stack:
| Layer | Choice |
|---|---|
| Hardware | Raspberry Pi 5, 8 GB |
| OS | Raspberry Pi OS Lite (Debian Trixie) |
| Init | cloud-init (headless SSH, avahi, hostname) |
| Container orchestration | K3s |
| Ingress | Traefik (bundled with K3s) |
| GitOps | Argo CD (Helm, app-of-apps pattern) |
| Downloads | SABnzbd |
| Media server | Jellyfin |
| Client | Jellyfin webOS app on LG C2 OLED |
Total cost: $191.90 for the hardware (CanaKit starter kit, shipped). Everything else is open source.
P.S. — there are faster boards
If raw performance is what you’re after, the Pi 5 is not the best single-board computer for a homelab in 2026. Not even close:
- Orange Pi 5 Plus — Rockchip RK3588, eight cores (4x A76 + 4x A55), dual 2.5 GbE, PCIe 3.0 x4 NVMe. Storage throughput alone is ~7x the Pi 5’s PCIe 2.0 x1.
- ZimaBoard 2 — Intel N150, dual 2.5 GbE, dual SATA, PCIe 3.0 x4, up to 16 GB LPDDR5x. x86 means you can run TrueNAS or unRAID without ARM quirks.
- ODROID-H3+ — Intel N5105, dual SATA, dual 2.5 GbE, up to 64 GB RAM. The go-to for serious NAS builds.
- LattePanda Sigma — Intel Core i5-1340P, full x86-64 desktop-class performance. Overkill for a media server, but it exists.
Any of these would eliminate the microSD bottleneck that caused most of my pain. The ODROID and ZimaBoard in particular would let you run NVMe + SATA drives and never think about I/O priority again.
I’ve used Pis since the first generation (photo booth controllers at a startup called Fanpics, circa 2013). I picked it again because it’s low drama: proper Debian, first-party kernel, no BSP builds, no worrying the vendor disappears in two years. I wanted to focus on the software stack, not fight hardware compatibility.
This post was co-authored with Claude Code, which also helped build and debug the homelab itself. The repo is private for now but the structure and approach are fully described above.